Tired of jumbo pixels muddling in-game detail on your Rift games? Wish there was a way to boost detail even on VR titles with no options? Then the Oculus Debug tool may just be your saviour, as long as you have a PC that can handle it.
Update (2/7/17): If you’re using your Rift with SteamVR, this free utility makes supersampling easy.
If you’re packing a PC with some reserve power and want a way to significantly improve image quality during your time in VR and your chosen game doesn’t include any options that help, we have a solution for you.
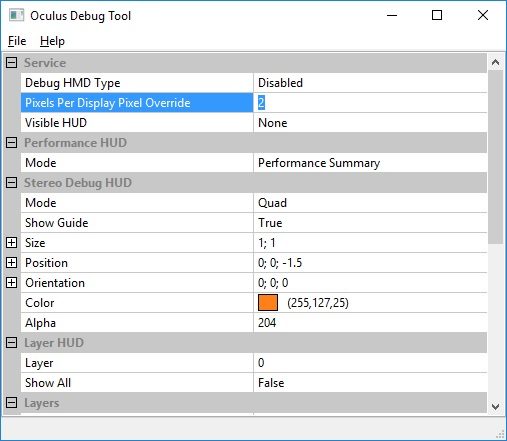
As part of the Oculus SDK (Software Development Kit), Oculus ship a handy tool which allows devs to throw extra information to help them troubleshoot performance issues or glitches and control runtime rendering elements like compositor layers etc. But one of the options also allows them to increase the running game’s pixel density, that is, the resolution the game is rendered at before being down-sampled and sent to the Oculus Rift display.
The tool allows you to increase said pixel density, and supports incremental values in between, with a setting of ‘2’ quadrupling the pixels your VR gaming PC has to render. This is effectively a form of super-sampling, a particularly expensive form of anti-aliasing that also happens to produce excellent image quality. But for games that offer minimal graphical options, and assuming you have the GPU grunt to push more pixels and maintain that hallowed 90FPS.
For the purposes of gauging image quality when compiling this very quick walk-through, we used the recently released Edge of Nowhere from Insomniac Games, a very pretty title which, sadly includes zero options to tweak in-game pixel density. The difference between the lowest and highest settings make to this game are pretty impressive – really allowing the production design detail shine through.
How to Run the Oculus Debug Tool to Improve Image Quality
- 1) Download the latest Oculus SDK from here and install.
- 2) Close any running instance of Oculus Home and / or Rift games you may be running.
- 3) Open Oculus Home again first, before anything else.
- 4) Now open the Oculus Debug tool before launching any games.
- 5) Set only the ‘Pixels Per Display Pixel Override’ option to a value of your choosing between 1.0 and 2.0 (no need to search for an ‘apply’ button – once the value is changed it should be active.
- 6) Launch your game of choice from within Oculus Home and enjoy the sharper image and revealed in-game detail.
- 7) Close the Oculus Debug Tool (this should fix any stuttering, according to reader feedback)
For every subsequent game you want to plat, open the debug tool first and set the value once again.
It’s important to follow the above steps precisely on your initial run, as doing it in a different order can cause severe stuttering, which you might put down to performance issues but in fact is just ‘how it works’. If you do see this, retry the above procedure and you may be surprised at the results.
We tested Edge of Nowhere with our Road to VR Exemplar gaming PC, which packs a Nvidia Geforce GTX 980ti, and managed to push a pixel density of 1.8 before frame rate became an issue and it was obvious Asynchronous Time Warp was working beyond its limits (jerky animation and skipped frames). The resulting difference in image is obvious however, with subtle texturing and shader effects revealed and far less distracting image artifacts on distant objects – it looked closer to how you imagine the artists envisaged it.
As far as we can tell, the debug tool overrides any in-game pixel density settings, so titles like Chronos and EVE: Valkyrie which allow you to tweak this, should simply adopt the Oculus Debug Tool setting. However, we haven’t tested this extensively, your mileage may vary and that goes for title compatibility too. Give it a shot and let us know how you get on in the comments below.