Since publishing his popular DIY VR headset guide back in 2014, Austin “Ohaple” is back with his latest refinements to the project, allowing you use use your DIY headset (or an off-the-shelf viewer like Google Cardboard) to play PC games by streaming them to your smartphone.
Ohaple is a life-long gamer and video producer. In addition to console and PC gaming, Ohaple has been designing, using, and refining his DIY HMD project since 2014. The he enjoys both the immersion of VR as well as the challenges presented by creating a low-budget system.
This article will discuss how you can get the most out of your DIY or Cardboard VR viewer by setting it up to play PC games. If you haven’t seen the previous article on how to make your own smartphone VR viewer, you can see that here. If you don’t want to do that project, products like Google Cardboard or Durovis Dive will also work great for this.
This project will cost $10-60 depending on what you already have, and does not require any real technical knowledge to setup, unlike many LED-tracking methods.
The principal here is to mirror your PC display to your phone’s screen. Because phones do not natively work as monitors for your PC, we will need streaming apps to get the image to the phone. There are many wireless solutions that work, but they often have problems when it comes to quality and latency. By connecting the phone via a sync cable, we can minimize latency and complexity while maximizing image quality.
To tackle motion tracking for the VR experience, we will use a gyroscopic mouse. This has the advantage of being very user-friendly, cheap, and low-latency. Additionally, it can be plugged in and used for VR with little setup, including mainstream games like Fallout 4, GTAV, or Battlefield. The disadvantage of using a gyroscopic mouse for head control is that you cannot decouple the head from the body like in some more advanced VR setups, and you do not get positional tracking.
Here is everything you will need for this project, you may already have most of what you need:
- Android or iPhone
- Sync cable (Lightning for iOS or MicroUSB for Android)
- Smartphone VR viewer (DIY or off-the-shelf)
- Gyroscopic mouse
- Over the head headphones
- Rubber bands or elastic
- EitherMouse software
- Duet Display for iPhone or similar for Android
- Computer
- Game with SBS 3D support
Step 1: Setting Up Smartphone Mirroring
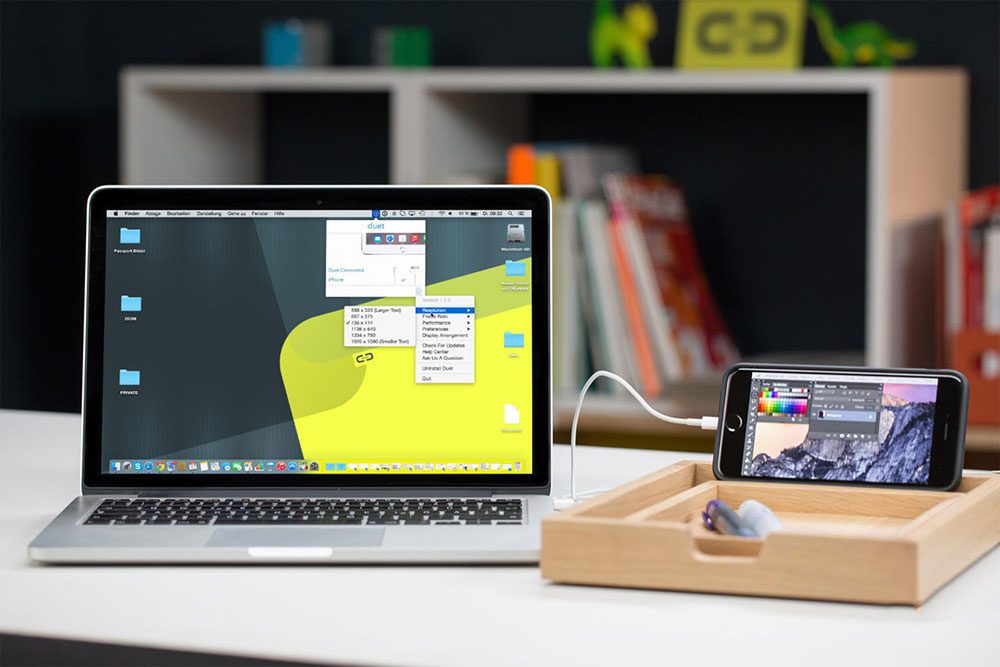
To begin, install your mirroring software of choice. Duet Display works perfectly for iOS (and is the only wired option). There are several similar options for Android, such as iDisplay and AirDisplay. Most of these software suites will have an app to install on your phone, and a desktop utility to install on your PC. Most of the high-end streaming apps will cost $5-15. The free wireless versions that I have tested work, but often are buggy, crash, or have higher latency.
Once you have it all installed according to the software’s instructions, test the mirroring and make sure that it is streaming properly. If done correctly, there should be little perceivable latency when turning your phone in your hand, and quality should be as high-bitrate as possible, limited only by the resolution of your phone. Try using the phone as a monitor for some web browsing or other daily tasks to test this.
Note: Many phones with lower display resolution will look fine, but have trouble displaying readable text. By lowering your desktop resolution setting to match the resolution of your phone, more text will be readable. In games, there may be text or HUD size settings. Adjust these to make sure text is readable.
Step 2: Setting Up SBS 3D
Setting up SBS 3D will vary depending on the game you want to play and the method you want to use. I will outline these methods, but once you choose one, be sure to consult the software developer’s instructions for full setup and optimization.
Use a 3D Driver
The second way to create a SBS 3D experience is to use a 3D game driver such as Tridef 3D or VorpX to make games that are 2D appear in great 3D SBS quality. This is one of the most common ways to play popular titles like Fallout, GTA, and Battlefield.
Find a Third-party Mod for a Specific Game
The third way to set up SBS 3D is to install a mod for the game you want to play. This can be a good option for games that are not supported by 3D drivers. One of the most popular games in the category is Minecraft. Here is a link to MinecRift, a great 3D mod for Minecraft. Modding games may lead to your game being unstable or crashing. For some games, modding is against the terms and conditions. Be sure to do your research before installing 3D mods.
Find a Game that Already Supports SBS 3D
One way to get a SBS 3D experience is to play a game that supports SBS 3D natively. These games will often just have a setting that allows you to switch into 3D mode. Many of these games are free, and are marketed toward the Oculus Rift platform. Some of these Oculus Rift games will work great, but many are locked until they detect the Oculus Rift device. These ‘locked’ games will not work with this method. Further, you should look for 3D games that support up/down mouse look as well as left/right mouse look. You can use this database to find some Rift games that will already support SBS 3D. For mainstream and triple-A games that support 3D natively, look to this list.
Note: Rift demos can be good candidates for use with this method but you’ll have to find older titles built with the Oculus SDK 0.6 or earlier which supports ‘Extended Mode’ (a SBS 3D view directly on your monitor). Newer demos and games won’t work without a Rift headset.
Step 3: Setting Up Gyroscopic Mouse Head Tracking
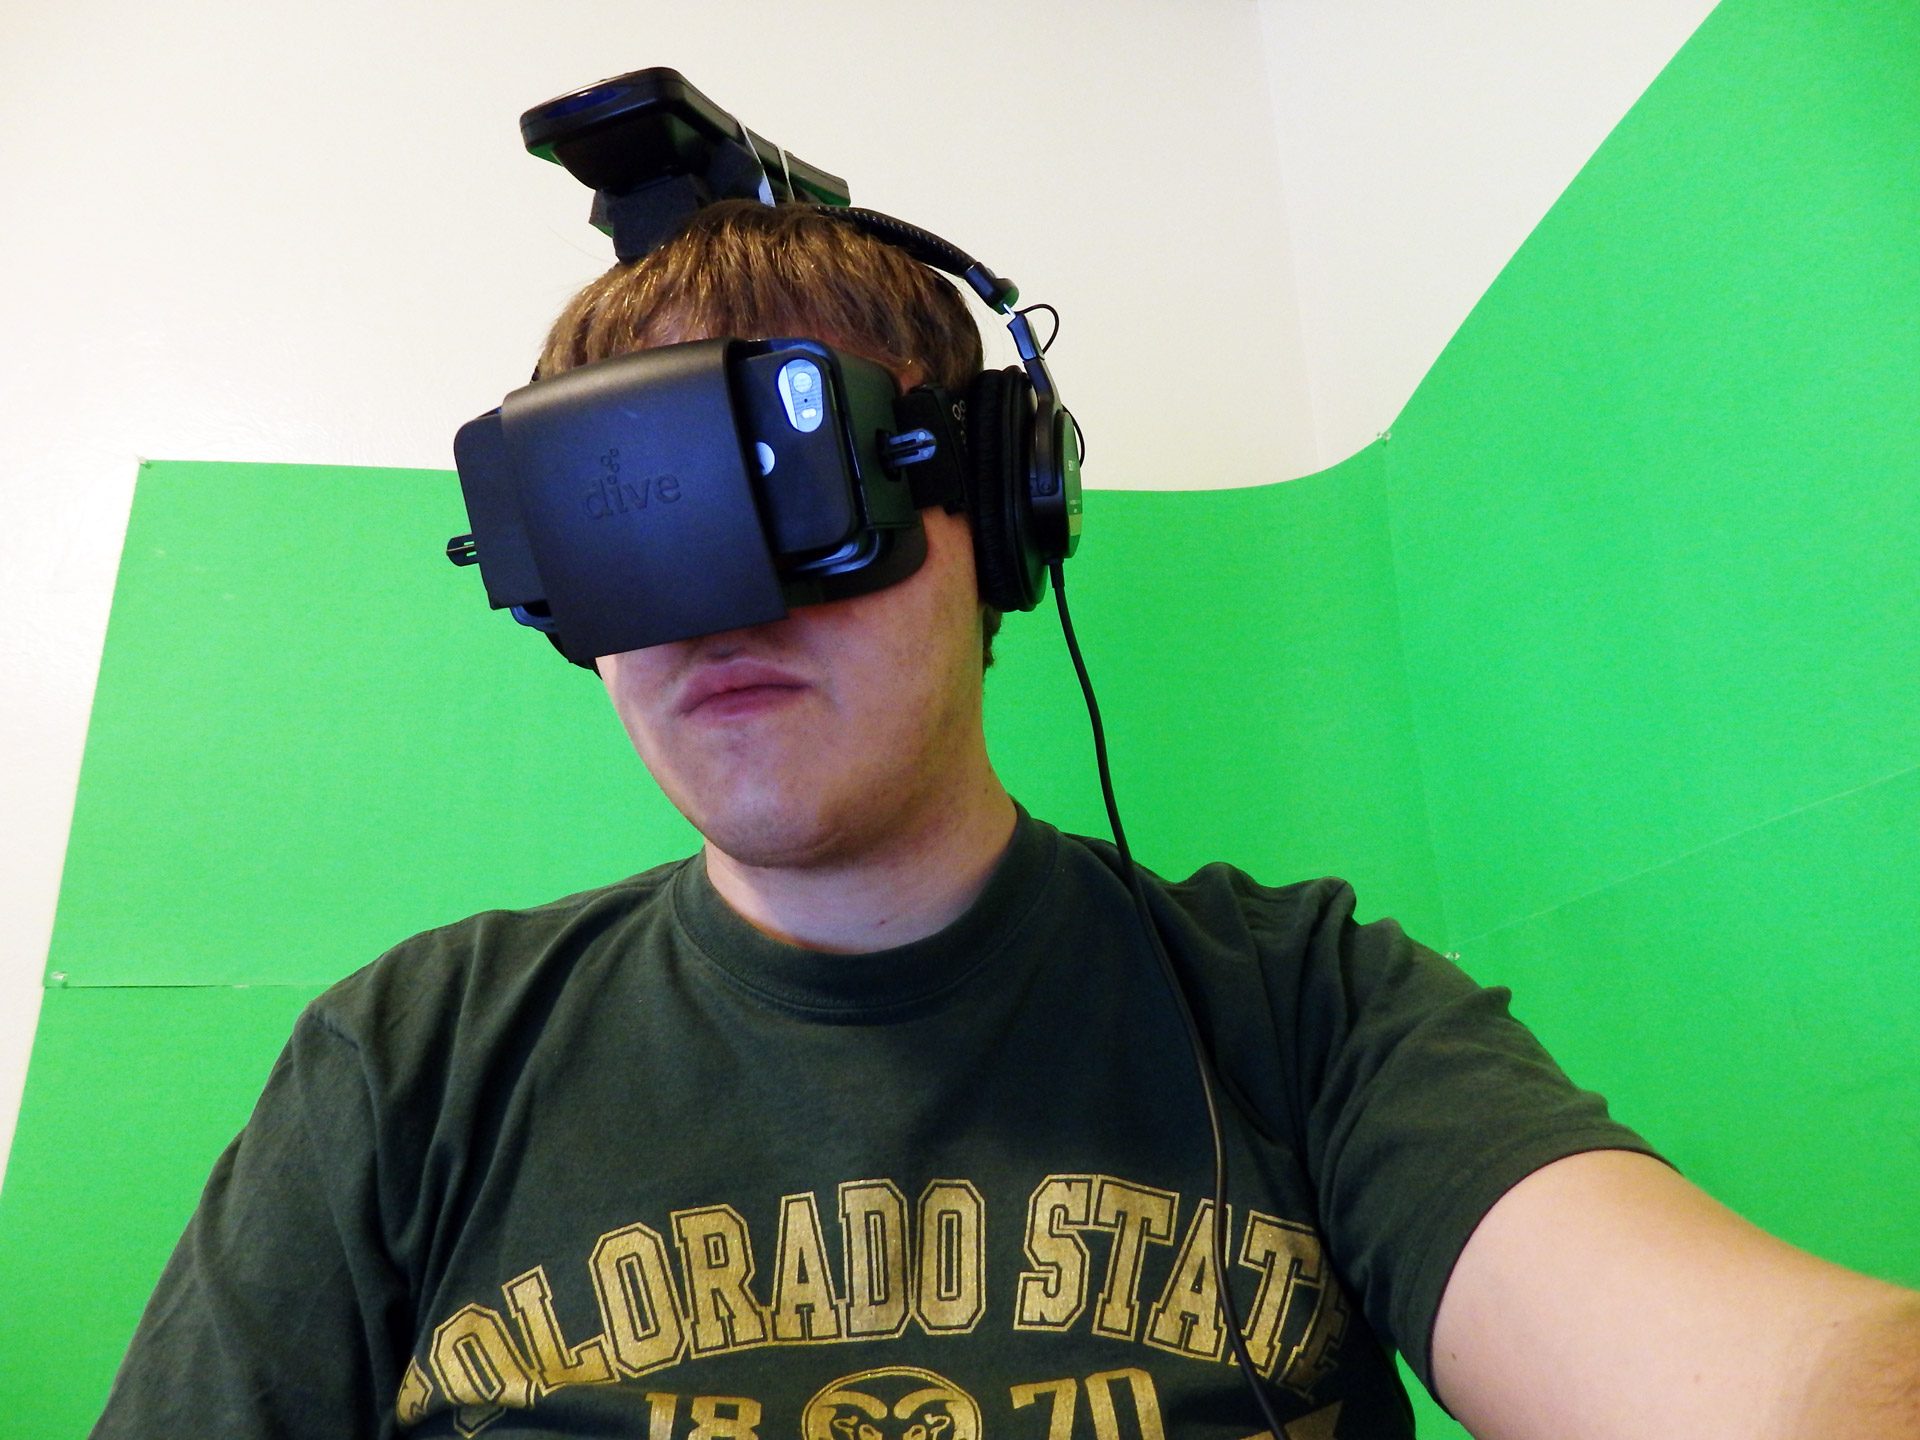
This is where the magic happens. In essence, it’s as simple as plugging in the wireless USB receiver to your PC and using it. There are only two considerations to using a wireless gyroscopic mouse for head tracking, mounting and sensitivity. You can find the gyroscopic mouse I use here.
Mounting the mouse to your smartphone VR viewer is rather simple. We do not want to mount it directly to the headset because it creates too much weight and will cause stress on your face and nose. Instead, we will get more comfortable and accurate tracking if we attach the mouse to the top of the headband of over-the-head headphones. Over-the-head headphones are already one of the best ways to create an immersive VR audio experience, so it works well to integrate them into this system.
The mounting is as simple as looping the rubber band around the front of the mouse, under the headband, and over the backside of the mouse as shown below. You will want to make sure that it is tight enough to keep the mouse from shifting during up and down tilting. Also be careful to check that the rubber band is not pressing any buttons on the mouse.
Tip: Use cloth elastic tied into a loop in order to completely customize the tension and keep from pulling your hair on rubber bands.
Look sensitivity should be a consideration because we are using your computer’s mouse functionality for both body turning and head movement. In many cases, setting up an appropriate turn speed on your desk mouse will mean that your gyroscopic mouse will turn too quickly when looking. Ideally, we want a 1:1 turning ratio between your head turning and the amount that you turn in the game. This means that if you turn your head 90 degrees fully to the left, your character should turn 90 degrees to the left. If the turning ratio is too far from 1:1, the VR experience will be disorienting.
To allow us to set your desk mouse and gyroscopic mouse sensitivities independently, we will need to use a utility called EitherMouse. Follow the developer’s instructions for general setup. To tune the sensitivity for your gyroscopic mouse, you will want to first select your desk mouse and set its sensitivity to where you prefer it. In order to tune the sensitivity of the gyroscopic mouse, you will need to launch a game (it doesn’t matter if it is in 3D). Turn the mouse 90 degrees to the left. If your character turns less than 90 degrees, turn the gyroscopic mouse sensitivity up. If your character turned too far, turn the sensitivity down. Once this is setup once, you should have the proper ratio set. Games will vary in sensitivity, but now that you have the ratio set in EitherMouse, you can use the in-game mouse sensitivity options to adjust the overall sensitivity to match that of the game you used to setup the sensitivity initially. This means you do not need to tweak the sensitivity in EitherMouse once you have done the initial setup.
Step 4: Have Fun!
Now that all the components are setup you can start your streaming, start your 3D game, and put the phone into your viewer. You have done everything you need to get a low-latency cheap VR setup. How immersive the experience is will depend on the quality of your phone display somewhat, but even older phones can make for an enjoyable gaming experience.
Tip: Turn your game’s graphics down some. The real resolution of each “screen” is going to be the short dimension by ½ of the longer dimension. This means even a 1080p display will have half the resolution in one direction. Because of this lower resolution many more complex textures may not come through and may actually make the game look “blurry” on the phone. Turning the graphics down to the lowest texture settings may actually make it look clearer.