VR on the web is still young but it’s making impressive progress thanks to pioneers like Arturo Paracuellos, creator of Inspirit, a responsive web VR experience. Paracuellos breaks down his approach to designing a scene that runs across multiple VR platforms directly in the web browser.
 Based in Zaragoza, Spain, Arturo Paracuellos has been creating digital interactive experiences since 2001. He’s combined his work helping brands connect with their audience with personal projects seeking new ways to interact with the digital user. For this reason he founded Unboring in 2010; his goal is to help grow 3D and VR on the web, enabling opportunities to interact with the user in ways never seen before.
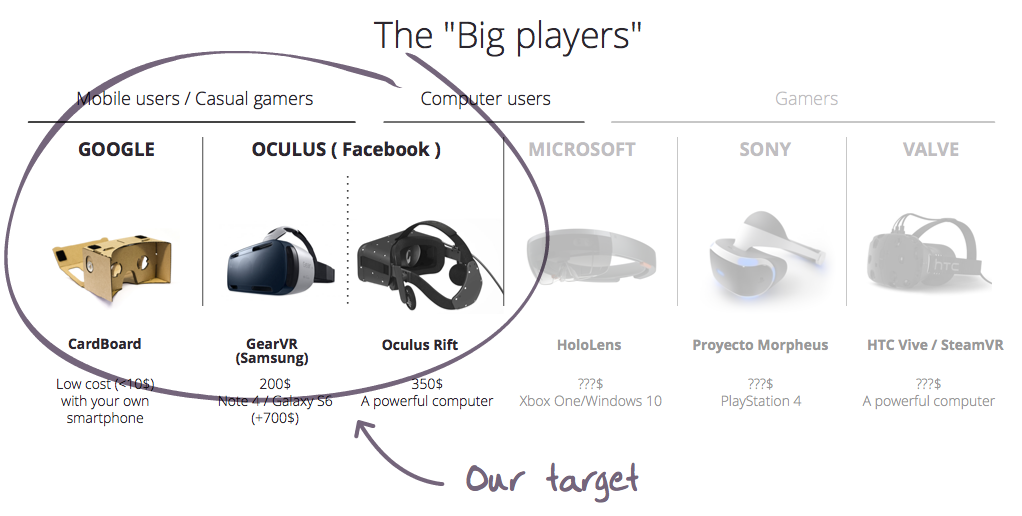
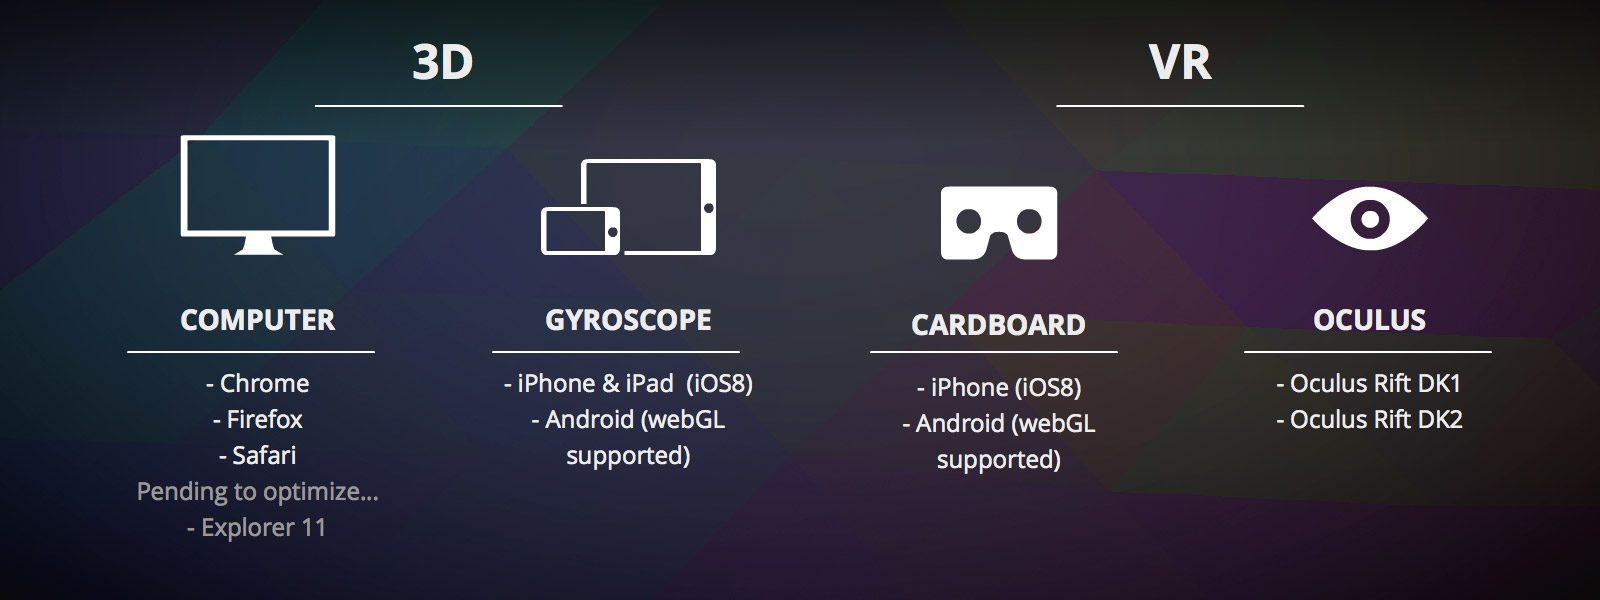
VR on the web targets a very interesting userbase. While high quality VR experiences will reach a large audience in 2016, they will need a headset connected (with a cable) to a powerful computer or a modern game console. Today, however, we already have the opportunity to offer a quite comfortable experience through the web thanks to WebGL (that has libraries like three.js created by Ricardo Cabello) which can be consumed in several ways:
- VR with Google Cardboard + a smartphone + Safari/iOS8 or Chrome/Android
- VR with Oculus Rift + Nightly versions of Chrome or Firefox (MozVR) thanks to folks like Brandon Jones from Google and Josh Carpenter from Mozilla who are working hard to integrate VR in our regular browsers
- 3D web over your smatphone’s browser moving around the scene with the gyroscope
- 3D web over your computer’s browser using your mouse
These last two points are very important because (with a responsive design) they are a gateway that enables a significant number of casual (non-VR) users to also enjoy web VR experiences and encourages them to make the leap to VR through the web in a very cheap and immediate way.
This is why I wanted to make Inspirit an experience for everyone: because the web gives us an opportunity now to tell stories, to reach users in a whole new way.
The Idea
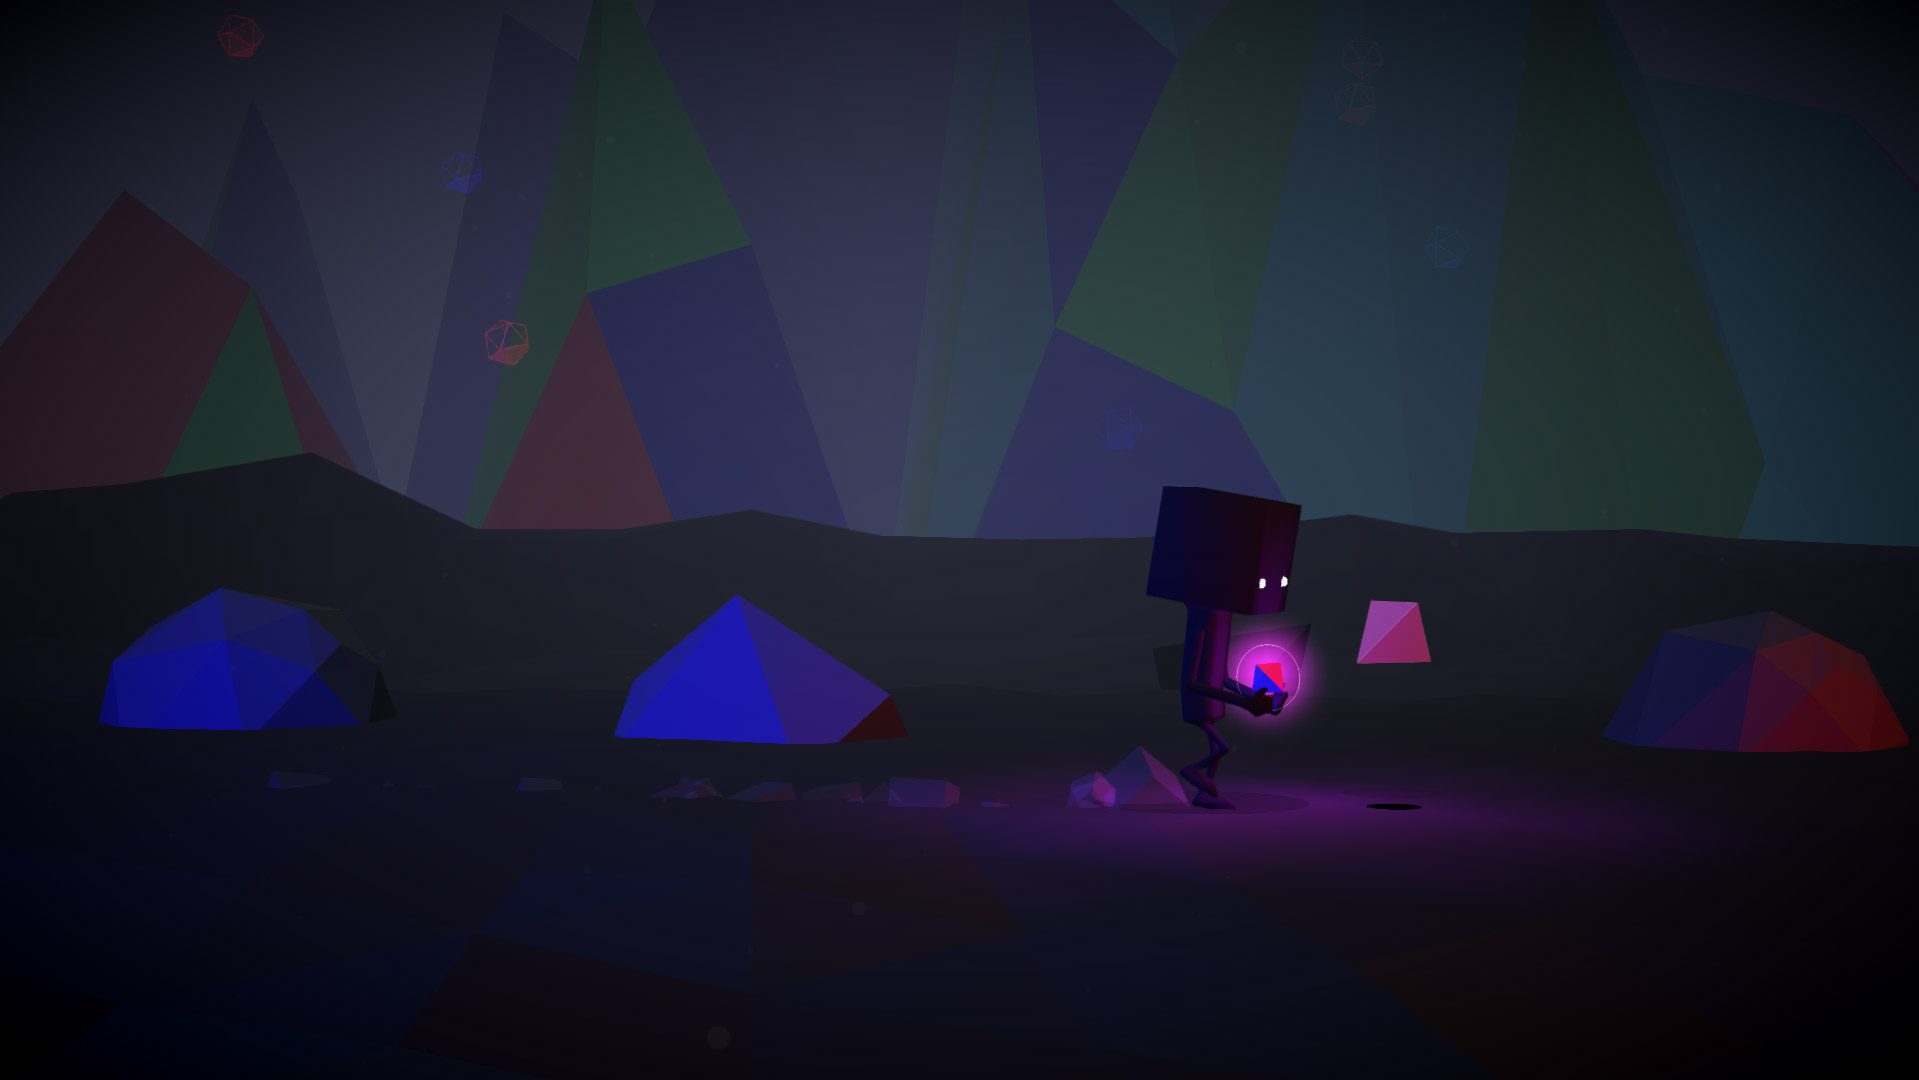
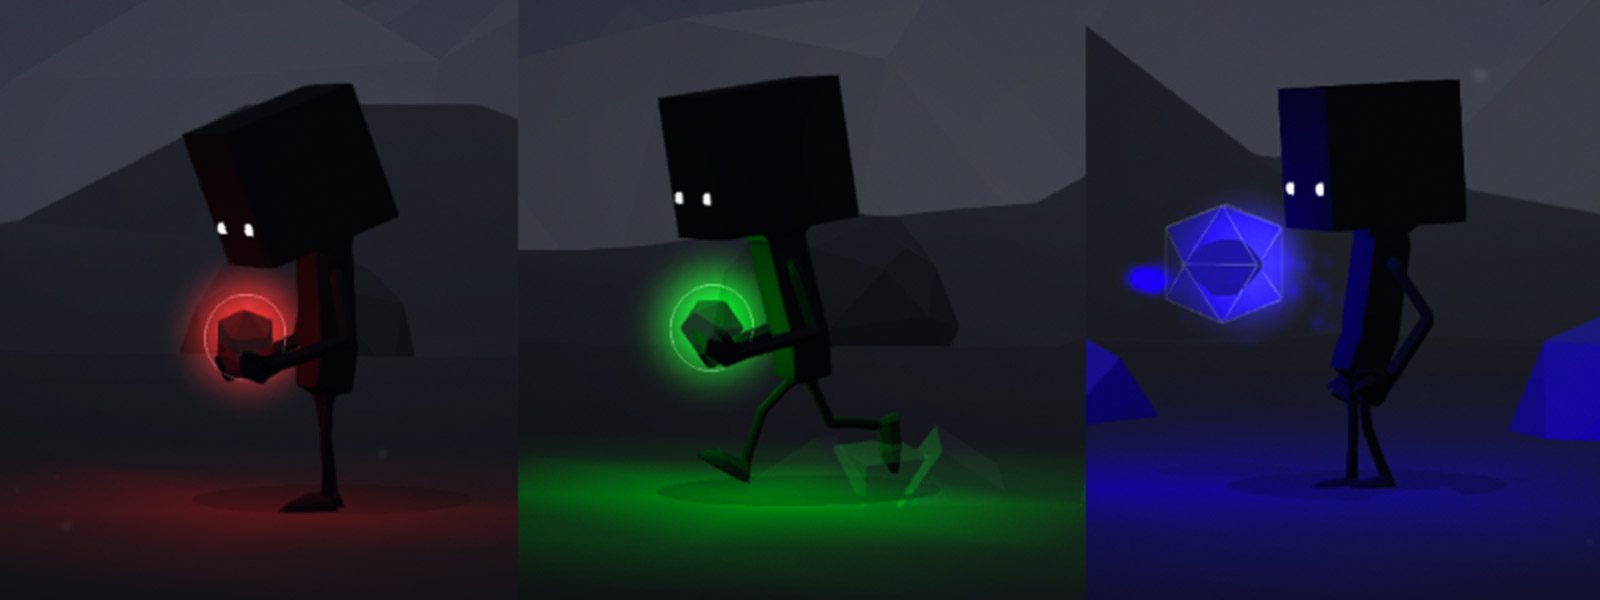
Trying to interactively tell a story which contained a small puzzle for the user to solve in order to move the experience forward. To tell a story, the first thing you need is a hero. Our hero had to find and then place a series of mysterious lights, thus illuminating his tiny world.
Inspirit may seem to be a story about light, but it is really more about people. People who enlighten us and complete us; because I like to think that there are people whose presence lights us up inside.
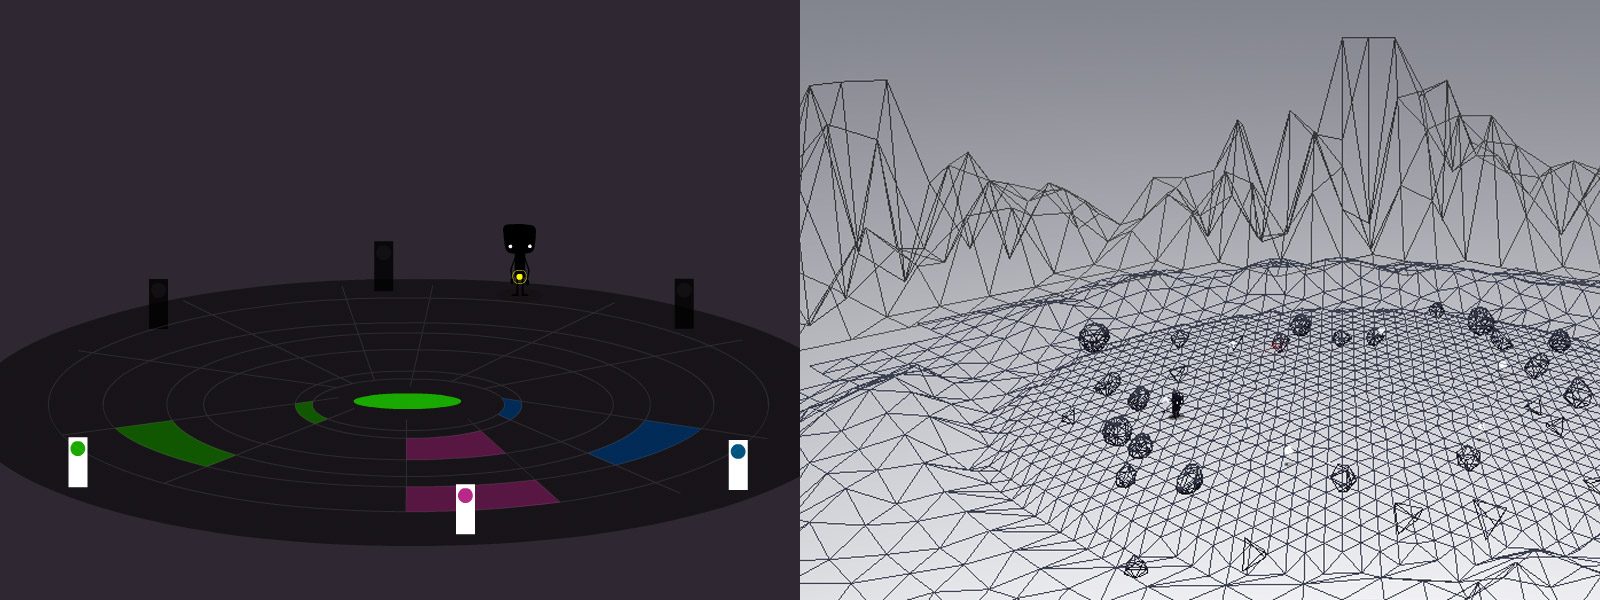
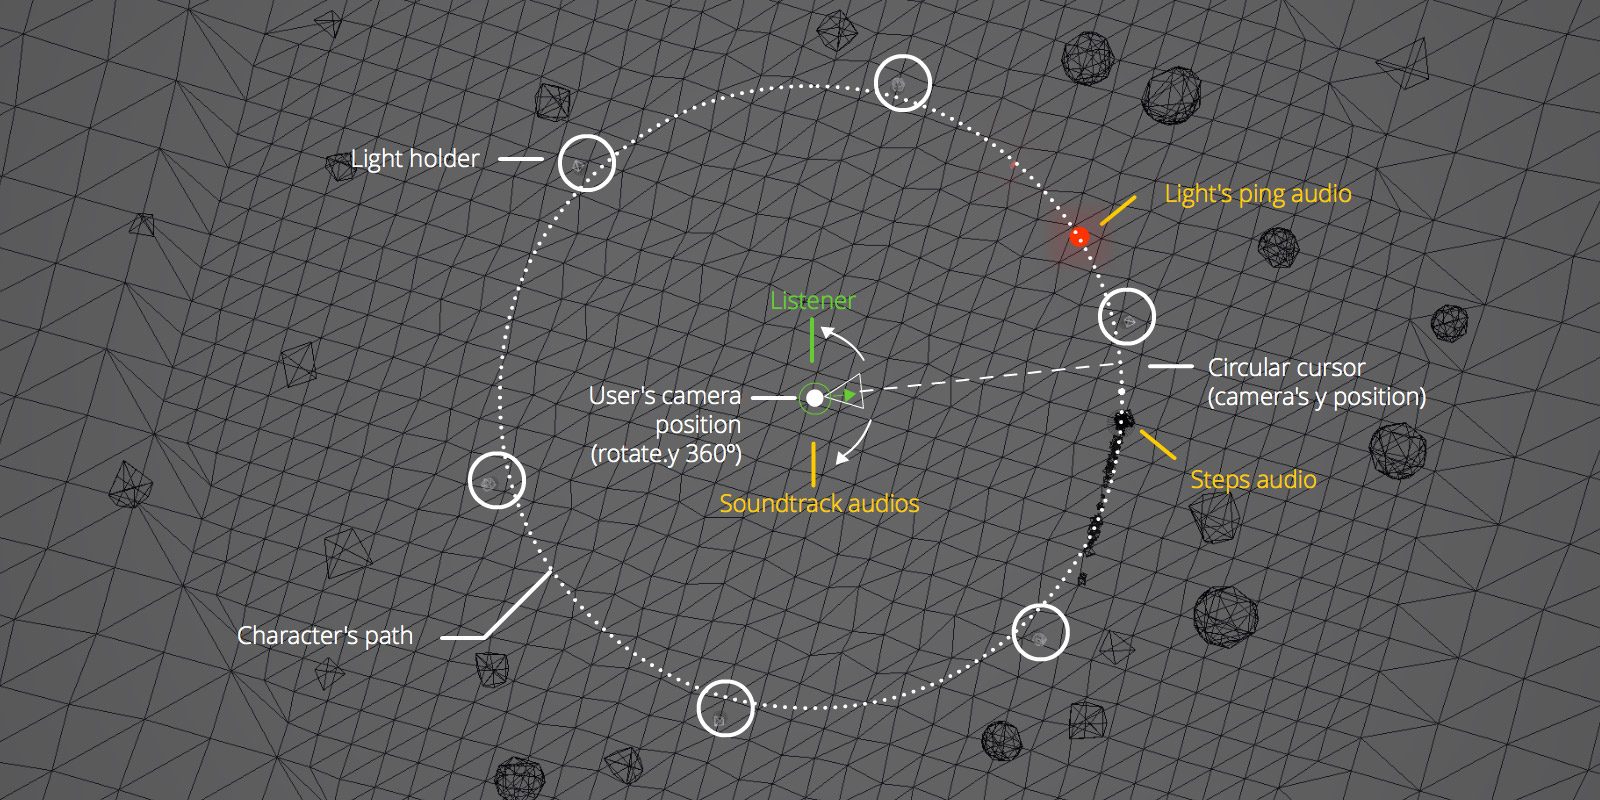
The original idea was for the lights to create a circle along which our hero was moving. Each light would emit color and a different sound when placed on its pedestal.
In the end, I decided to add mountains and elements behind the the character’s path. This helps in virtual reality, where distant objects appear to move less when you change your point of view. Elements stay longer in the frame and you are able to appreciate them much better.
Multi-platform Experience
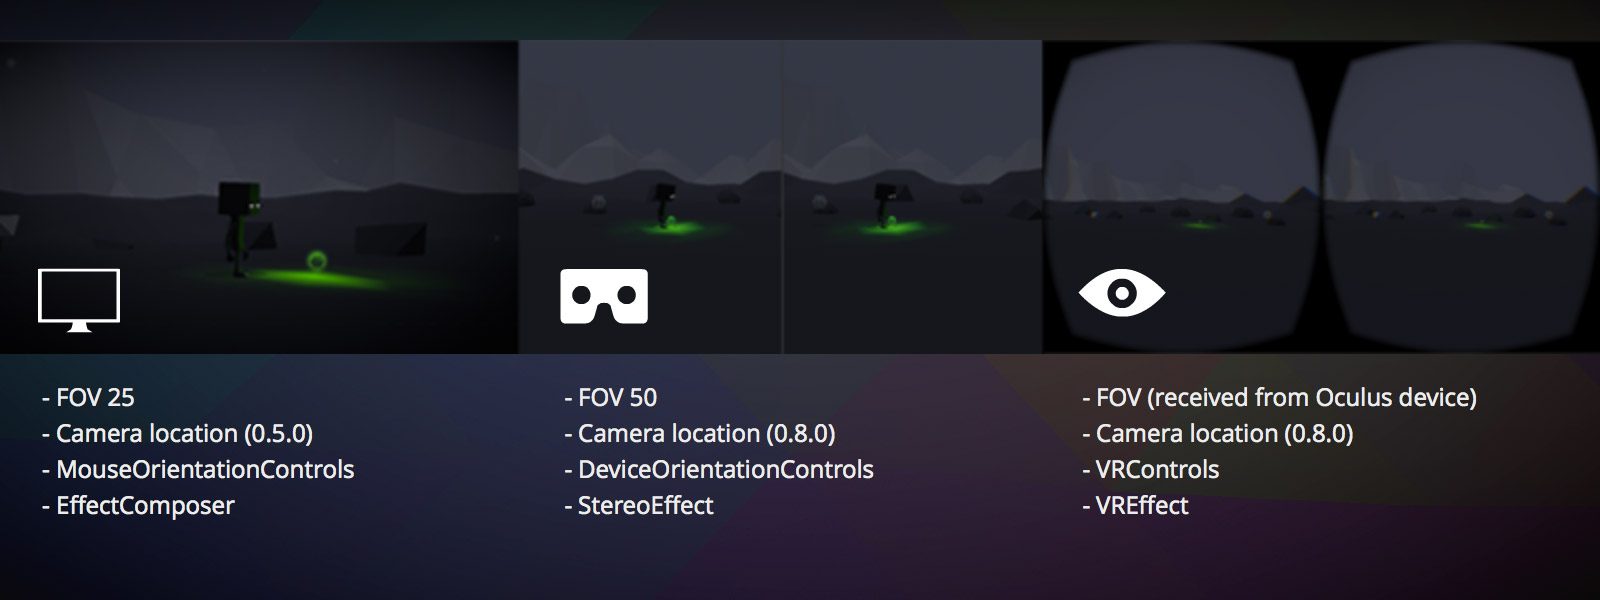
There are four different ways to experience Inspirit. That is because one of the of the goals of the project is demonstrating to a potential client my ability to tell an interactive story or create a 3D experience on multiple levels, where viewers can experience it in a number of ways. Perhaps only a few visitors will use the VR or Cardboard options, but if you are able to offer that, you’re saying a lot about how far you can take a message.
For this reason, you can view it on your computer (locking the mouse cursor when the experience begins), on smartphone with a gyroscope or a WebGL-ready tablet (particularly for the many iPad users), with Cardboard for the half million owners of this headset (at this point it was key for me to get it to work for iPhone users) and you also have the VR option to use an Oculus Rift device, and all of it needed to work through the browser.
Technical Challenges
The main challenge was learning to develop web VR based on webGL, discovering the particular quirks it had when creating a project for Cardboard (it had to be optimized for smartphones) or the Oculus Rift. Modeling and exporting for webGL, integrating web audio APIs into a 3D scene, and using particles were significant challenges too.
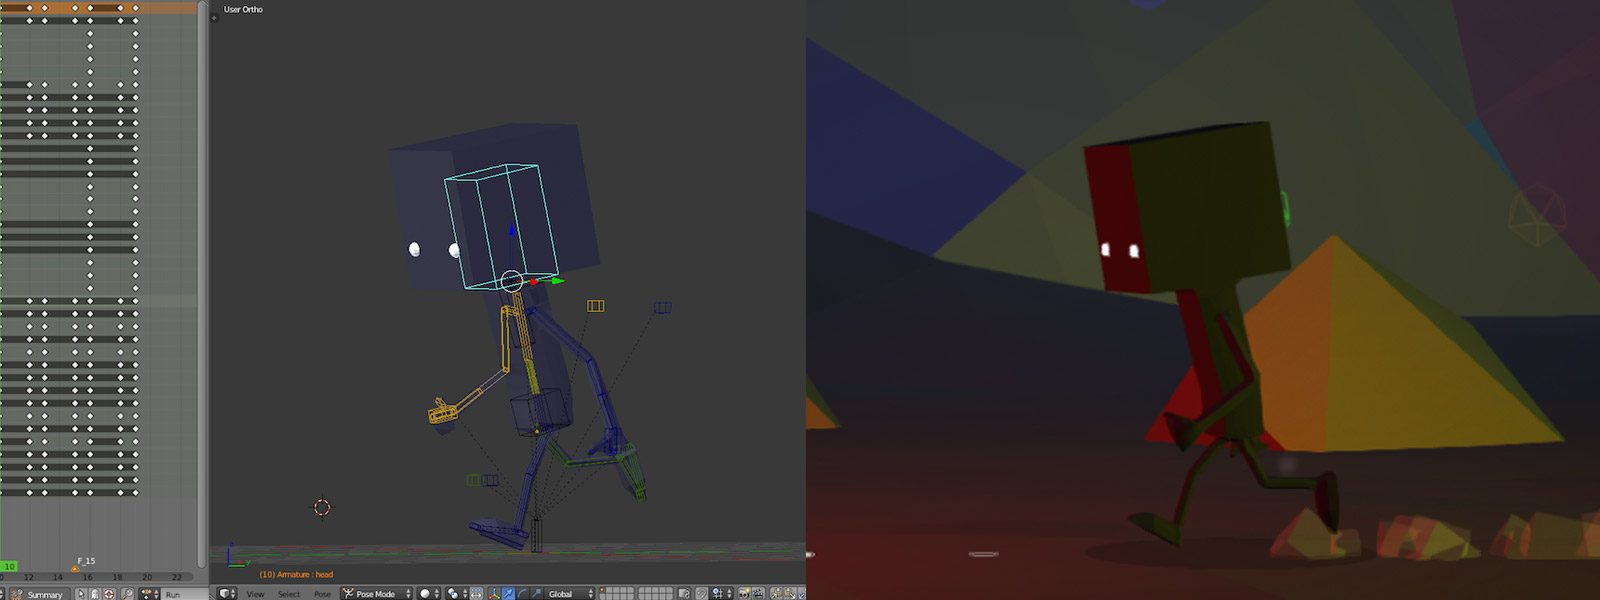
Animated Character as a Lead Actor
Working with Blender as a 3D tool, the first step was to model a simple character (1075 vertices) and to create a skeleton for his movements to be based on user actions. After that, I created 12 animations in a loop of about 2 to 3 seconds. Most of them were for export to the skeletal animations in three.js with the exporter that comes with the library (before exporting always remember to remove the Armature modifier).
And finally, when it was time to animate, the BlendCharacter class by Michael Guerrero that appears in the three.js examples was very useful once adapted to the project’s needs.
3D Audio
Since I was focused on VR, I knew that 3D sound would enrich the scene as well as make the experience much more immersive. My curiosity was first piqued when reading this post by Felix Turner, and then last year at Jaume Sanchez’s presentation ‘Everybody dance now with Web Audio API’. After attending that presentation, I thought that someday I would implement it in a project.
I used the THREE.Audio and THREE.AudioListener as the base, and then integrated it to cohabitate with SoundJS and PreloadJS. Thus creating a class (Audio3DControls.js) that added the sound buffer loaded with SoundJS to the previously created instance of THREE.Audio. This made it possible to create an Analyser to get frequencyBinCount or to work with the panner, gain, or context of the audio.
One of the barriers that you run into using the Web Audio API is the difference between iOS’ Safari browser and other browsers where audio is muted until user interaction. Also if you constantly modify the position of the listener, you can’t hear it well on iOS. So in my case, rather than moving it all the time, it changes if the camera position varies more than 5°.
Another aspect to consider is the position of the listener. I created an invisible object halfway between the camera and the protagonist’s path. That way it was nearest to where the sounds were coming from and was changing position. With a fixed camera setting, if I set the listener to 0,0,0 (still playing with the panner audio) I would not get the desired effect.
Audio Interaction Within the Scene
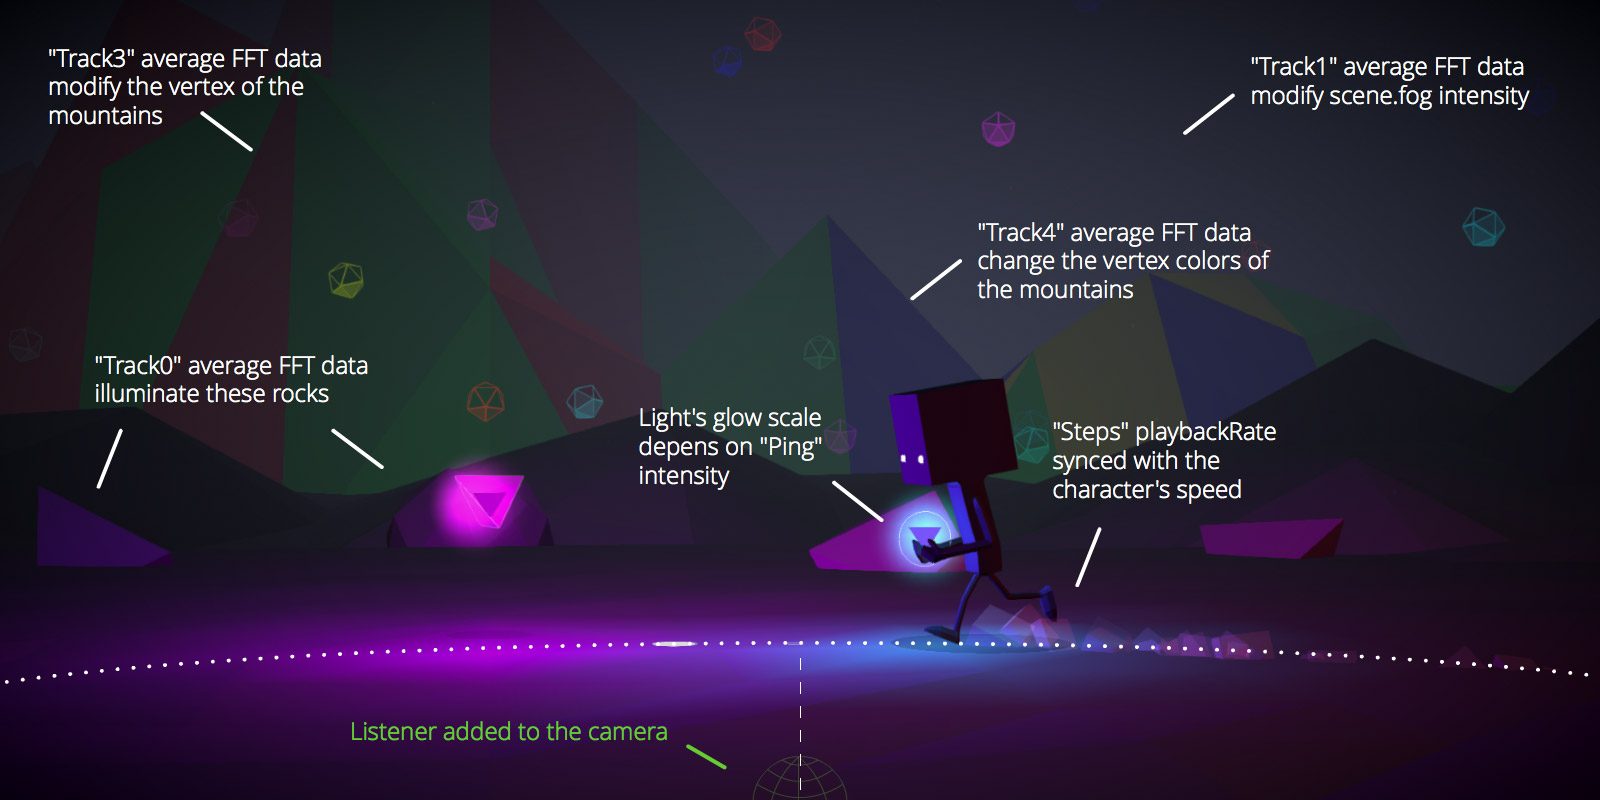
I had great expectations for this part of the project. I asked Guillermo Laporta, who collaborated with the music, to create a tune divided into 7 parts. It was a base and six tracks, one for each of the pulpits to unlock. Each light activated a new sound motif.
In the end I managed work with the mean value of the FFT which we imported from the analyzer for each sound. So depending on the intensity, we modified the parameters of various graphic elements of the scene. It was also was very effective synchronize playbackRate loop for steps with the speed of the character, which automatically synced with the sound of the character’s footsteps.
Unifying the Experience for Different Devices
Another challenge was to get the same navigation to work well on very different devices. You had to be able to use a computer mouse, a smartphone’s gyroscope, a smartphone with Cardboard or and Oculus Rift… and it was also important to have a computer as a fallback for quick testing.
For this project I had to modify the DeviceOrientationControls, MouseOrientationControls, and VRControls classes so that they sent an alpha angle depending on where the user was looking, in order to allow handling via a circular cursor. Additionally, for each configuration, the FOV and the height of the camera changed to suit each device’s field of view settings.
Lessons Learned Developing for Virtual Reality
One of my biggest concerns was to avoid producing dizziness or sickness in users with the misuse of technology. I also wanted to see how far I could go developing the project with javascript.
Designing for VR
One of the main lessons is that there are things that result in attractive views on the computer screen but turn out to be annoying in VR. In the former, you have to avoid making the viewer constantly refocus their attention. Avoid making several elements move in separate directions at once as it tires the eyes out quickly from trying to focus on them.
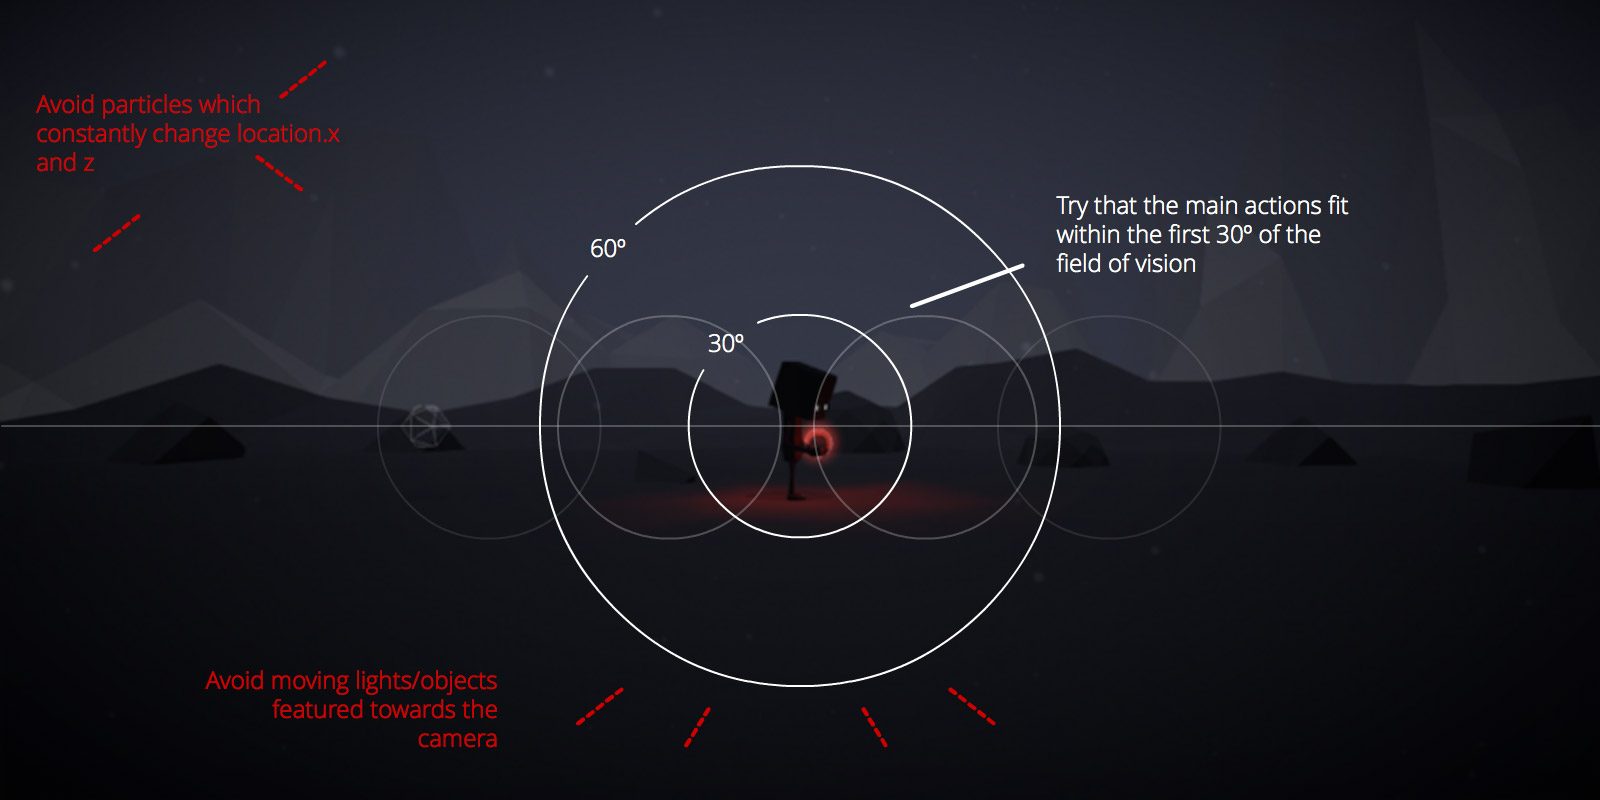
One of the main articles that deal with this issue is Quick VR Mockups with Illustrator by Mozilla’s Josh Carpenter. His approach to the human field of view for VR is very valuable. It’s also interesting to the VR Interface Design Manifesto, especially where they explain how human visual perception works. Additionally this interview with the creator of Temple Run, who also created a VR version, gives some tips on what to avoid when designing an experience for VR.
“Be keenly aware of people’s sensitivity to motion and Avoid doing things in-game that might cause people to get motion sick”
“anytime you cause camera movement that isn’t directly initiated by the player, you are asking for trouble.”
VR Programming
Although I used a system where the user chooses the type of experience at first, Boris Smus has created a responsive solution. The WebVR Boilerplate, is a good start for creating different types navigation based on the user’s requirements.
Especially when optimizing for use with Cardboard, I ran into two problems to solve:
- Managing the device’s sleep time. This is because when you are viewing it with Cardboard, you do not touch the screen for a long time. In iOS this hack still works, but for Android devices there is no such thing and you have to access Sleep Time settings in the webvr-manager.js of the WebVR Boilerplate there is a method to solve this problem for iOS and Android devices.
- Another is how to enter fullscreen and landscape position to watch the experience. In Android, using screen.orientation.lock (‘landscape’); combined with document.fullscreen are easy one-click ways to achieve it. But in iOS we can only display a notification when you switch to portrait mode.
Production
Development was greatly accelerated thanks to tools like Grunt, used to automate publishing tasks for both desktop and mobile, and Bower, to manage library packages. Of course, the base of everything was the 3D Javascript library three.js mostly developed by Ricardo Cabello, from which I used several examples and classes. Additionally, I fragmented the WebGL part into numerous files for each class, the result was a more structured and scalable project.
I generally used libraries like jQuery, TweenMax, SoundJS or PreloadJS to make programming more comfortable and took advantage of the benefits of js-signals for event handling, and handlebars for templates.
Final Result
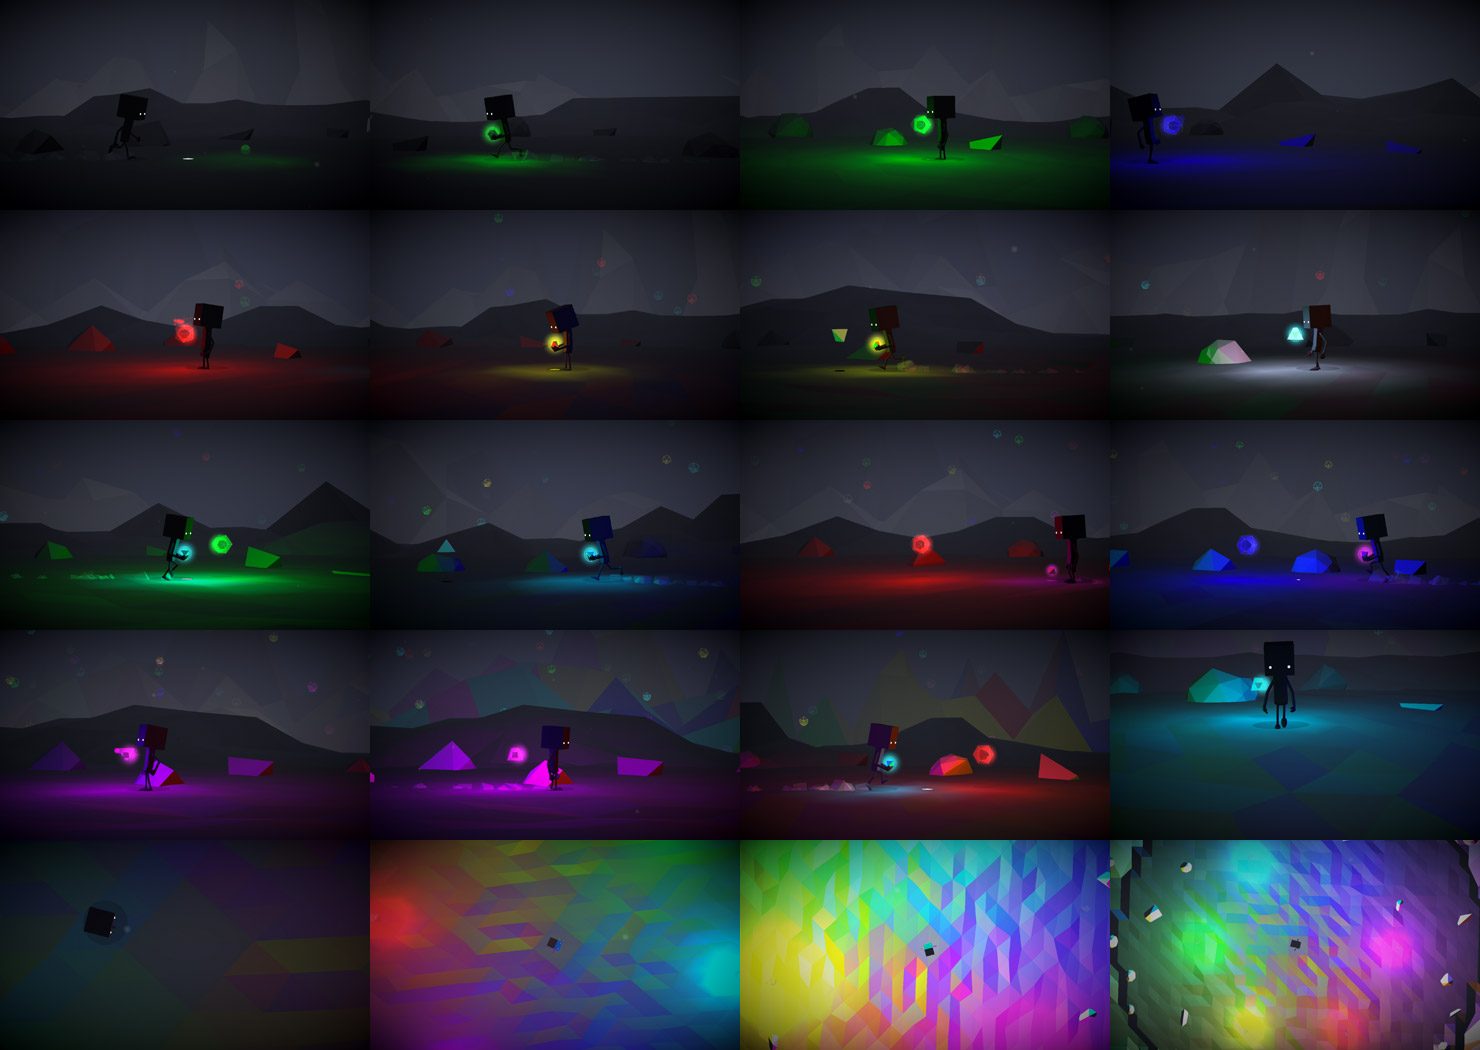
As in art books or Pixar shorts, I created a Color Script with screenshots for different moments of the experience. I like to think that because of the interactivity, every viewer will see a different order of colors.
The final product can be seen in inspirit.unboring.net. I hope you enjoy the experience.
Future challenges
The world of 3D web and the emergence of VR give us the opportunity to offer new ways of interacting with content. My goal is to create innovative projects that demonstrate that you can get amazing results directly on the web.
For future projects, I want to use textures in characters, optimize and reuse characters by dynamically customizing their dimensions, and integrate Leap Motion in the experiences.
Would you like to work with me in achieving these goals? If you found this article interesting and would like to pursue a 3D/VR web project, I’d be happy to hear from you. You can learn more about my work and contact me here.
You can reach Arturo on twitter @arturitu and keep up with his innovative web work @un_boring.